Category Archives: mac

Increase performance of Vagrant + VirtualBox synced folders

The standard synced folders set up in Vagrant uses the VirtualBox’s shared folders feature. Unfortunately, the performance of shared folders leaves a lot to be desired. There is a solution to this poor performance, which involves switching to an NFS-based solution.

This can be done simply by adding the nfs flag to the config.vm.synced_folder setting in your Vagrantfile:

config.vm.synced_folder '.', '/vagrant', nfs: true

You also need to make sure you are using Vagrant’s private_network networking option:

config.vm.network "private_network", ip: "192.168.56.101"

Once you have done this, you can vagrant up (if your VM is not currently running) or vagrant reload (if you VM is currently running) to get NFS up and running. When you do this for the first time, you’ll likely be prompted to enter your administrator’s password so that the NFS details can be saved to /etc/exports:

==> default: Preparing to edit /etc/exports. Administrator privileges will be required...
Password:

The performance increase you experience will vary, but on my 1.3 GHz Intel Core i5 MacBook Air, I experienced a 6x performance boost. I used wrk to benchmark the VM web server performance before and after:

Using VirtualBox shared folders:

$ wrk http://localhost:8000
Running 10s test @ http://localhost:8000
  2 threads and 10 connections
  Thread Stats   Avg      Stdev     Max   +/- Stdev
    Latency     0.00us    0.00us   0.00us     nan%
    Req/Sec     4.11      3.22     9.00     55.56%
  10 requests in 10.04s, 1.22MB read
  Socket errors: connect 0, read 0, write 0, timeout 10
Requests/sec:      1.00
Transfer/sec:    124.20KB

Using NFS:

$ wrk http://localhost:8000
Running 10s test @ http://localhost:8000
  2 threads and 10 connections
  Thread Stats   Avg      Stdev     Max   +/- Stdev
    Latency     1.38s   214.51ms   1.86s    63.24%
    Req/Sec     5.33      3.83    19.00     71.43%
  68 requests in 10.05s, 8.40MB read
Requests/sec:      6.76
Transfer/sec:    855.64KB

Glen Scott

I’m a freelance software developer with 18 years’ professional experience in web development. I specialise in creating tailor-made, web-based systems that can help your business run like clockwork. I am the Managing Director of Yellow Square Development.

More Posts

Follow Me:
TwitterFacebookLinkedIn

Set up local DNS caching server on Mac with dnsmasq

brew install dnsmasq
sudo brew services start dnsmasq

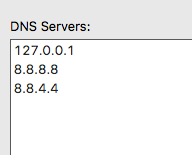
Go into your System Preferences -> Network settings and add 127.0.0.1 at the top of your list of DNS servers. Make sure you have some upstream DNS servers listed underneath — when dnsmasq cannot read from the cache, this is where it will fetch the DNS records from.

$ dig google.com | grep -i time
;; Query time: 33 msec

$ dig google.com | grep -i time
;; Query time: 0 msec

Glen Scott

I’m a freelance software developer with 18 years’ professional experience in web development. I specialise in creating tailor-made, web-based systems that can help your business run like clockwork. I am the Managing Director of Yellow Square Development.

More Posts

Follow Me:
TwitterFacebookLinkedIn

Install the MySQL slow query analyser pt-query-digest on Mac

cd ~
curl -LO https://percona.com/get/pt-query-digest
chmod +x pt-query-digest
./pt-query-digest --help

Glen Scott

I’m a freelance software developer with 18 years’ professional experience in web development. I specialise in creating tailor-made, web-based systems that can help your business run like clockwork. I am the Managing Director of Yellow Square Development.

More Posts

Follow Me:
TwitterFacebookLinkedIn

Re-enable Apache & PHP Web Sharing on OS X Yosemite

The Web Sharing feature is a useful way of testing out simple sites and applications using the built-in Apache server in OS X. Although I don’t recommend using it for complex projects (I recommend Vagrant for those cases), it’s still a useful thing to have.

After upgrading from from Mavericks to Yosemite, the built in web server no longer was configured to serve content from /Users/(username)/Sites. Here are some brief instructions on getting it back up and running:

First, it’s worth noting that Yosemite is now using Apache 2.4 rather than 2.2, which was included in Mavericks. This has an effect on some authorisation settings, which you will see below.

As an administrator, load the following file in an editor:

/etc/apache2/extra/httpd-userdir.conf

Uncomment the following line:

Include /private/etc/apache2/users/*.conf

Edit the following file

/etc/apache2/httpd.conf

Uncomment the following lines:

LoadModule userdir_module libexec/apache2/mod_userdir.so
LoadModule php5_module libexec/apache2/libphp5.so
Include /private/etc/apache2/extra/httpd-userdir.conf

Edit your user configuration under /etc/apache2/users/username.conf

Change any instances of:

Order allow,deny
Allow from all

to

Require all granted

(this was one of the major changes between Apache 2.2 and 2.4 — see more details here http://httpd.apache.org/docs/2.4/upgrading.html)

Re-instate your previous PHP configuration:

sudo mv /etc/php.ini-5.2-previous /etc/php.ini

If you want to have Apache startup automatically when you Mac boots, enter the following:


sudo launchctl load -w /System/Library/LaunchDaemons/org.apache.httpd.plist

Finally, start Apache:

sudo apachectl start

If all goes well, you’ll see a message similar to this logged in /var/logs/apache2/error_log:

[Mon Oct 20 07:26:42.063040 2014] [mpm_prefork:notice] [pid 4412] AH00163: Apache/2.4.9 (Unix) PHP/5.5.14 configured -- resuming normal operations

You should also now be able to access your shared files in your browser via http://localhost/~username/

Any questions? Please use the comments section below!

P.S. – Looking for reliable hosting for your PHP projects? I recommend Clook:

Glen Scott

I’m a freelance software developer with 18 years’ professional experience in web development. I specialise in creating tailor-made, web-based systems that can help your business run like clockwork. I am the Managing Director of Yellow Square Development.

More Posts

Follow Me:
TwitterFacebookLinkedIn

Simple development hosts on Mac

This tutorial will show you how you can easily set up new virtual hosts on the stock Mac Apache install, perfect for testing and developing small PHP projects. Once you have done this, new projects can be set up by just creating new directories — no adding hosts to /etc/hosts or adding new Apache configuration will be required.

We are going to use ~/Sites/ as the base directory, and we’ll be able to dynamically serve from any directories under this. The name of the directory that you use will form part of the URL that you will use.

So, for example, if you created the following under ~/Sites/

mkdir -p ~/Sites/siteone/htdocs
mkdir -p ~/Sites/sitetwo/htdocs
mkdir -p ~/Sites/anothersite/htdocs

Then you will be able to access content from htdocs under the following URL’s

Notice how we are using the .localhost TLD for this. RFC 2606 specifies that .localhost is reserved for local testing purposes.

So, how do we get to this setup? There are two parts:

1. Set up .localhost proxying

First of all, we need to make sure that any requests to a .localhost domain are routed to the local loopback device. For this, we will use the Automatic Proxy Configuration facilities of OS X.

We need to create the following Proxy Configuration File:

function FindProxyForURL(url, host)
{
	if (dnsDomainIs(host, ".localhost")) {
		return "PROXY localhost";
	}
 
	return "DIRECT";
}

Save the file as localhost.pac and place it in your ~/Sites/ directory.

Now, open up your System Preferences and go into Network. Select your network in the left hand pane, and click the ‘Advanced…’ button on right. Click the ‘Proxies’ tab and check ‘Automatic Proxy Configuration’. In the ‘Proxy Configuration File’, enter the URL to your file, for example http://localhost/~username/localhost.pac.

Click on ‘OK’ and then ‘Apply’.

2. Set up Apache VirtualHost

Edit the Apache configuration file for your user which is stored under /etc/apache2/users/.conf, and add the following:

<VirtualHost *:80>
    VirtualDocumentRoot "/Users/<username>/Sites/%1/htdocs"
    ServerName subdomains.localhost
    ServerAlias *.localhost
</VirtualHost>

Restart Apache with sudo apachectl restart

3. Test!

mkdir -p ~/Sites/mysite/htdocs
echo 'Hello World!' > ~/Sites/mysite/htdocs/index.html

Visit http://mysite.localhost/ in your browser, and you should see “Hello World!”

References

Glen Scott

I’m a freelance software developer with 18 years’ professional experience in web development. I specialise in creating tailor-made, web-based systems that can help your business run like clockwork. I am the Managing Director of Yellow Square Development.

More Posts

Follow Me:
TwitterFacebookLinkedIn

Setting up a perfect PHP development environment on your Mac

generations

Note 22nd Jan 2014: I no longer have the time or enthusiasm for this book, so the project has been abandoned, sorry! The page is left here for archive purposes only.

One of my most popular blog posts has been the instructions on installing the PHP mcrypt extension on Mac OS X. I recall needing mcrypt for a phpMyAdmin installation, and thought the install instructions would be useful for others. It was: to date, the page has had 19,174 views!

The popularity of this post got me thinking — how exactly are people using Mac OS X for PHP development?

I’ve been using OS X for development for many years now, and I’ve built up a lot of knowledge about how to create an environment that’s a pleasure, rather than a chore, to use. A lot of this knowledge I am taking for granted, but I am sure it will be of use to others.

I’m putting this knowledge into my first e-book.

Here’s an example of what topics I’ll be covering:

Part I – Native

Where I look at options for working on smaller projects, or projects where your deployment environment is unknown.

  1. Configuring Apache
  2. Adding PHP modules
  3. Adding PECL modules
  4. Installing and running MySQL, PostGreSQL and MongoDB
  5. Installing and configuring phpMyAdmin
  6. Installing and configuring MAMP

Part II – Virtualization

For working with medium – large projects where your deployment environment is known.

  1. Installing Vagrant
  2. Setting up your first virtualized PHP environment
  3. Puppet provisioning
  4. Vital development tools
  5. Part III – Specific environments

    If you are developing for a specific framework or tool, this chapter will help.

    1. Installing a test instance of Magento
    2. Create a WordPress plugin and theme development environment
    3. Create an environment for Zend Framework or CodeIgniter applications

    Are you interested in finding out more? If so, please add your e-mail address to the list and I’ll keep you updated on the progress of the e-book.

    Also, if you have any subjects that you would covered, please add a comment to the page.

    Glen Scott

    I’m a freelance software developer with 18 years’ professional experience in web development. I specialise in creating tailor-made, web-based systems that can help your business run like clockwork. I am the Managing Director of Yellow Square Development.

    More Posts

    Follow Me:
    TwitterFacebookLinkedIn

Compiling PHP extensions using Xcode 4.3 and above

Prior to version 4.3 of Xcode, Apple bundled a load of command line tools with it that are used to compile native binaries, including PHP extensions. However, as of version 4.3, these tools are not bundled by default. Therefore, if you require these tools you need to take one of two actions:

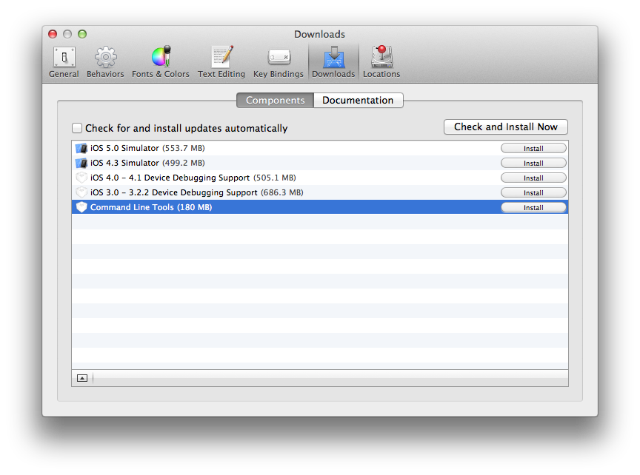
1. If you already have Xcode 4.3 installed, go into the Components tab of the Download preferences panel and make sure Command Line Tools are selected

Xcode CLI tools installation

OR

2. Download and install the command line tools as an independent package from either;

a. Apple (requires Apple ID)
b. GitHub

Once you have the command line tools installed, you are able to compile native binaries.

If you found this post useful, it would be great if you could Like my Facebook page using the button in the sidebar. Thanks!

Glen Scott

I’m a freelance software developer with 18 years’ professional experience in web development. I specialise in creating tailor-made, web-based systems that can help your business run like clockwork. I am the Managing Director of Yellow Square Development.

More Posts

Follow Me:
TwitterFacebookLinkedIn

Installing Alternative PHP Cache (APC) on Mac OS X Lion

The APC extension should be a straightforward PECL install, but sadly it does not work on Mac OS X Lion. Attempting to install will result in make errors similar to the following:

In file included from /private/tmp/APC/apc.c:44:
/usr/include/php/ext/pcre/php_pcre.h:29:18: error: pcre.h: No such file or directory
In file included from /private/tmp/APC/apc.c:44:
/usr/include/php/ext/pcre/php_pcre.h:37: error: expected ‘=’, ‘,’, ‘;’, ‘asm’ or ‘__attribute__’ before ‘*’ token
/usr/include/php/ext/pcre/php_pcre.h:38: error: expected ‘=’, ‘,’, ‘;’, ‘asm’ or ‘__attribute__’ before ‘*’ token
/usr/include/php/ext/pcre/php_pcre.h:44: error: expected specifier-qualifier-list before ‘pcre’
/private/tmp/APC/apc.c:393: error: expected specifier-qualifier-list before ‘pcre’
/private/tmp/APC/apc.c: In function ‘apc_regex_compile_array’:
/private/tmp/APC/apc.c:454: error: ‘apc_regex’ has no member named ‘preg’
/private/tmp/APC/apc.c:455: error: ‘apc_regex’ has no member named ‘nreg’
/private/tmp/APC/apc.c: In function ‘apc_regex_match_array’:
/private/tmp/APC/apc.c:487: error: ‘apc_regex’ has no member named ‘preg’
/private/tmp/APC/apc.c:488: error: ‘apc_regex’ has no member named ‘nreg’
make: *** [apc.lo] Error 1
ERROR: `make' failed

Thankfully, the solution is simple. To being with, make sure you have Xcode installed. If you have xCode 4.3 or above, make sure you have the command line tools installed.

APC requires PCRE libraries and header files to be available, so we can download and install these from source:

./configure
make
sudo make install

Next, we can install the APC extension using the normal PECL route:

sudo pecl install apc

Confirm that you have the following line in your php.ini file:

extension=apc.so

Restart Apache, if required:

sudo apachectl graceful

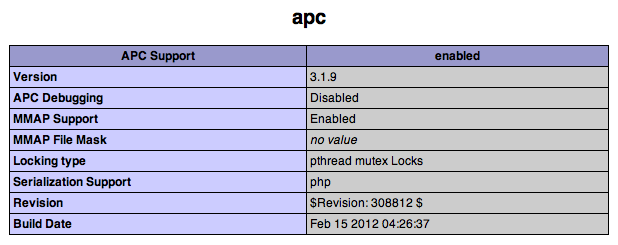
You should now have APC available, and you can confirm this by looking at your phpinfo output:

APC PHP info


Want advice on building better software? Join my mailing list…


Glen Scott

I’m a freelance software developer with 18 years’ professional experience in web development. I specialise in creating tailor-made, web-based systems that can help your business run like clockwork. I am the Managing Director of Yellow Square Development.

More Posts

Follow Me:
TwitterFacebookLinkedIn

Mac OS X 10.7.3 upgrades PHP from 5.3.6 to 5.3.8

As described in Apple’s security notes for Mac OS X 10.7.3, PHP is upgraded from 5.3.6 to version 5.3.8 as part of the update.

Glen Scott

I’m a freelance software developer with 18 years’ professional experience in web development. I specialise in creating tailor-made, web-based systems that can help your business run like clockwork. I am the Managing Director of Yellow Square Development.

More Posts

Follow Me:
TwitterFacebookLinkedIn

iCal 502 error when syncing with Yahoo! Calendar

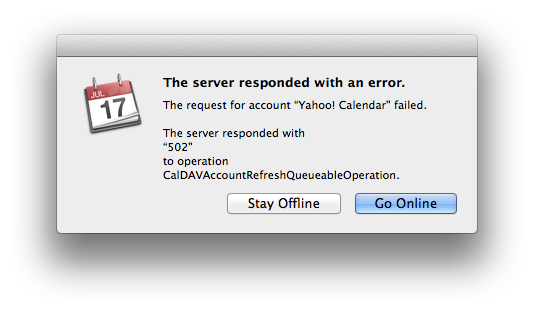
In the last few days, my iCal has been giving me the following error message when trying to access my Yahoo! Calendar via CalDAV:

The request for account "Yahoo! Calendar" failed.

The server responded with
"502"
to operation
CalDAVAccountRefreshQueueableOperation.

iCal error message when syncing with yahoo! calendar

Yahoo! have acknowledged this is a problem on their side:

We are aware of a Calendar (Proxy error) and our engineering team is working to resolve this issue. We apologize for the inconvenience and hope to have it resolved soon.

(source: Syncing / Mobile Sync | Yahoo! Calendar Help)

update 2nd November 2011: I am no longer seeing this error message, and Yahoo! have removed the notice from their help page. Looks like the issue has been resolved!

update 3rd November 2011: Seems like I spoke too soon, the error is back!

Glen Scott

I’m a freelance software developer with 18 years’ professional experience in web development. I specialise in creating tailor-made, web-based systems that can help your business run like clockwork. I am the Managing Director of Yellow Square Development.

More Posts

Follow Me:
TwitterFacebookLinkedIn